
My recent activity with Nano Server is to experiment with deploying Python 3.x on Nano Server and have posted an article on TechNet Wiki on how to prepare a Nano Server to run Python 3.x programs or scripts.
You can either view this article from the Microsoft TechNet Wiki which may have any improvement updates by the TechNet community on the link below;
Or carry on reading this page on the original article which I have noted in my engineering journal with some explanations on the process.
The Original TechNet Wiki Article on Nano Server: Deploying Python 3.x interpreter
1. Introduction
In this article, we will demonstrate how to deploy Python 3.5.2 in Nano Server and work with Python preferred installer program (PIP) for Python extension capability.
2. Python Requirements
In order to begin the deployment using PowerShell, we will requires the followings:
*Recommended Python program to manage any Python libraries or programs.
3. Getting Started with Python in Nano Server
In this section, we will demonstrate on how to prepare to install Python into Nano Server with some basic Python command demonstrations.
3.1. Download the Python compressed package
In this section, we will start off with creating a Temp folder in the management server and download the Python 3.5.2 package to the management server prior to extracting the files and transferring to the Nano Server.
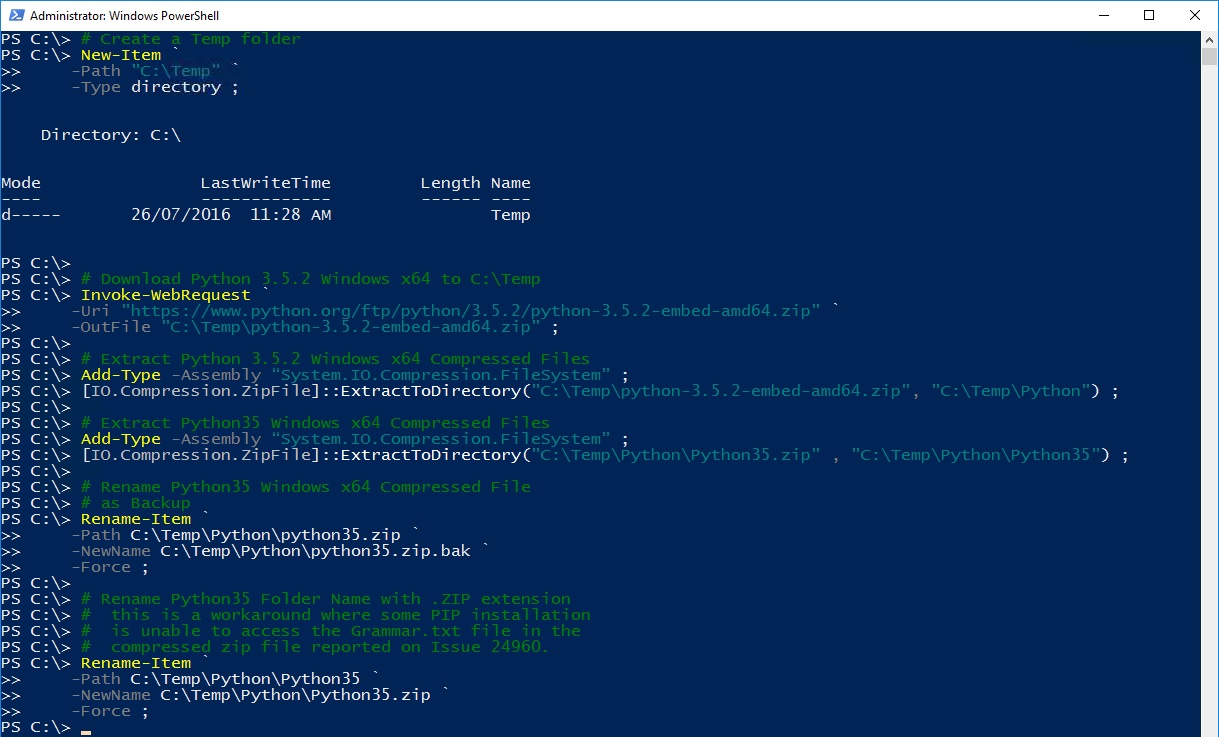
# Create a Temp folder
New-Item `
    -Path "C:\Temp" `
    -Type directory ;
# Download Python 3.5.2 Windows x64 to C:\Temp
Invoke-WebRequest `
    -Uri "https://www.python.org/ftp/python/3.5.2/python-3.5.2-embed-amd64.zip" `
    -OutFile "C:\Temp\python-3.5.2-embed-amd64.zip" ;
# Verify Python 3.5.2 Windows x64 has been downloaded
Get-ChildItem `
    -Path "C:\Temp\python-3.5.2-embed-amd64.zip" ;
3.2. Extract the Python compressed package
In this section after we have downloaded the Python compressed package, we will demonstrate uncompressing the Python compressed packages.
# Extract Python 3.5 Windows x64 Compressed Files
Add-Type -Assembly “System.IO.Compression.FileSystem” ;
[IO.Compression.ZipFile]::ExtractToDirectory("C:\Temp\python-3.5.2-embed-amd64.zip", "C:\Temp\Python") ;
# Extract Python 3.5.2 Windows x64 Compressed Files
Add-Type -Assembly “System.IO.Compression.FileSystem” ;
[IO.Compression.ZipFile]::ExtractToDirectory("C:\Temp\Python\Python35.zip" , "C:\Temp\Python\Python35") ;
In order to address an Python issue 24960 where it is unable to find the Grammar.txt file, we have provided a workaround for Python 3.x below.
# Rename Python35 Windows x64 Compressed File
#  as Backup
Rename-Item `
    -Path C:\Temp\Python\python35.zip `
    -NewName C:\Temp\Python\python35.zip.bak `
    -Force ;
# Rename Python35 Folder Name with .ZIP extension
#  this is a workaround where some PIP installation
#  is unable to access the Grammar.txt file in the
#  compressed zip file reported on Issue 24960.
Rename-Item `
    -Path C:\Temp\Python\Python35 `
    -NewName C:\Temp\Python\Python35.zip `
    -Force ;
3.3. Installing Python into Nano Server
Once we have downloaded and extracted the Python content on the management server, we will have to copy the Python uncompressed content to Nano Server. You will need to follow the next section in configuring the Python environmental path in Nano Server in order for the Python program to be able to access its Python libraries.
# Invoke PowerShell command to Nano Server
#  remotely to create a Python folder
Invoke-Command `
    -ComputerName "192.168.100.21" `
    -ScriptBlock { `
        # Create a Python folder
        #  in Nano Server remotely
        New-Item `
            -Path "C:\Python" `
            -Type directory ;
    } `
    -Credential ( `
        New-Object `
            -TypeName System.Management.Automation.PSCredential `
            -ArgumentList "192.168.100.21\Administrator", `
            (ConvertTo-SecureString `
                -String "Password123" `
                -AsPlainText `
                -Force)
    ) ;
# Copy the Python 3.5.2 Windows x64 content
#  from extracted folder to Nano Server remotely
Copy-Item `
    -Path "C:\Temp\Python\*" `
    -Destination "\\192.168.100.21\C$\Python" `
    -Recurse ;

3.4. Configure Python environmental path variable in Nano Server
With the Python content copied to the Nano Server, you will need to configure the Nano Server environmental path variable to allow the Python program to be able to access all its Python libraries. In this section, we will demonstrate the Python required Environmental Path for Python 3.x and you may need to add other path if you have installed other Python packages which we will not be demonstrating below.
# Establish a remote PowerShell Session to the Nano Server
Enter-PSSession `
    -ComputerName "192.168.100.21" `
    -Credential ( `
        New-Object `
            -TypeName System.Management.Automation.PSCredential `
            -ArgumentList "192.168.100.21\Administrator", `
            (ConvertTo-SecureString `
                -String "Password123" `
                -AsPlainText `
                -Force)
    ) ;
# Display the current Environmental Path
$Env:Path ;
# Set C:\Python , C:\Python\Python35 , C:\Python\Python35\Scripts path
#  into Environmental Path variable temporary
$Env:Path += “;C:\Python;C:\Python\Python35;C:\Python\Python35\Scripts” ;
# Display the current Environmental Path
$Env:Path ;
# Permanently set C:\Python , C:\Python\Python35 , C:\Python\Python35\Scripts
#  path into Environmental Variable
SETX PATH $Env:Path /M

3.5. Validate Python installation in Nano Server
In this section, we will demonstrate a simple test to validate that the installed Python program is functioning properly in the Nano Server by executing the python.exe to display its version number.
# Let's test if Python is working now
python -V
3.6. Creating Python script in Nano Server
Once we have validated that the Python program is functioning, we will create a Python script to test the Python program properly by importing some of the Python library modules to generate some kind of output back to console.
# Create a Python Test Script python-test-script.py
#  to verify if the  script execute properly
Set-Content `
    -Value "
import platform ; `r`n
import os ; `r`n
import socket ; `r`n
import ipaddress ;`r`n
print(
'Platform Hostname  : ' + platform.node() + '\n' +
'Platform Version   : ' + platform.system() + ' ' + platform.version() + '\n' +
'Platform Machine   : ' + str(platform.machine()) + '\n' +
'Platform Processor : ' + platform.processor() + '\n' +
'Platform IP Address: ' + socket.gethostbyname(socket.gethostname()) + '\n' +
'Python Compiler    : ' + platform.python_compiler() + '\n' +
'Python Version     : ' + platform.python_version() + '\n' +
'Python Build       : ' + str(platform.python_build()) + '\n\n' +
'Hello World from Python in Nano Server by Ryen Tang (MVP)' + '\n'
) ; `r`n
    " `
    -Path "C:\python-test-script.py" `
    -Encoding Ascii ;
3.7. Executing a Python Script in Nano Server
In this section, we will demonstrate how to execute the Python script that we have created previously and verify whether the Python script is functioning as expected.
# Execute the Python Test Script
python .\python-test-script.py

4. Getting Started with Python Preferred Installer Program (PIP)
In this section, we will demonstrate on how to prepare to install Python Preferred Installer Program (PIP) into Nano Server with some basic Python PIP command demonstrations that will connect to the internet to discover Python program packages or libraries.
4.1. Setting up Public DNS Name Resolution on Network Interface
In this section, we will configure the Nano Server network interface with Public DNS Server IP Addresses. This enables Nano Server to resolve any public URL when accessing the internet and allow any Python packages download from the internet using Python Preferred Installer Program (PIP).
Due to the fact of my environment where the Nano Server was originally deployed into non-external facing network for development, I had to disconnect that network interface and present another network interface with an external facing network that is able to reach out to the internet for the remaining demonstrations with a different IP address from that external facing network.
# Display Network interfaces
Get-NetAdapter ;
# Set Public Dns Server on Network
#  interface 2
Set-DnsClientServerAddress `
    -InterfaceIndex 2 `
    -ServerAddresses ("8.8.8.8","8.8.4.4") ;

4.2. Download Python Preferred Installer Program (PIP) script
In this section, we will download the get-pip.py Python script into the management server and copy the Python script to the Nano Server.
# Download Python get-pip.py script to C:\Temp
Invoke-WebRequest `
    -Uri "https://bootstrap.pypa.io/get-pip.py" `
    -OutFile "C:\Temp\get-pip.py" ;
# Copy the Python get-pip.py script to C:\Temp
#  in Nano Server remotely
Copy-Item `
    -Path "C:\Temp\get-pip.py" `
    -Destination "\\192.168.150.206\C$\" ;
4.3. Installing Python Preferred Installer Program (PIP) in Nano Server
In section after we have copied the get-pip.py Python script into Nano Server, we will use Python to execute the get-pip.py Python script to download and install the Python Preferred Installer Program (PIP) into Nano Server.
# Verify locally that the Python get-pip.py has
#  been copied to Nano Server
Get-ChildItem `
    -Path "C:\get-pip.py";
# Execute get-pip.py script to install
#  Python preferred installer program
python .\get-pip.py
# Get the path where pip.exe is located
Get-ChildItem `
    -Path C:\Python `
    -Filter pip.exe `
    -Recurse ;
4.4. Configure Python PIP environmental path in Nano Server
Once get-pip.py Python script has successfully downloaded the packages, we will need to setup the Python Preferred Installer Program (PIP) environmental path in the Nano Server.
# Get the path where pip.exe is located
Get-ChildItem `
    -Path C:\Python `
    -Filter pip.exe `
    -Recurse ;
# Set C:\Python\Scripts path for pip.exe
#  into Environmental Path variable temporary
$Env:Path += “;C:\Python\Scripts” ;
# Permanently set C:\Python\Scripts
#  path into Environmental Variable
SETX PATH $Env:Path /M
4.5. Listing Python programs using PIP in Nano Server
In this section after we have completed the installation and configuration of the Python Preferred Installer Program (PIP), we will verify Python Preferred Installer Program (PIP) is functioning properly by listing the current installed packages in Nano Server.
# List available Python packages using
#  Python preferred installer program (PIP)
pip list

4.6. Searching Python programs using PIP in Nano Server
In this section after we have setup the DNS Server configuration on the network interface to provide DNS resolution capability, we will demonstrate how we will use PIP to search for Python programs or packages through the internet.
# Use Python preferred installer program (PIP)
#  to search for packages related to pyfiglet
pip search pyfiglet
# Use Python preferred installer program (PIP)
#  to search for packages related to termcolor
pip search termcolor
# Use Python preferred installer program (PIP)
#  to search for packages related to colorama
pip search colorama
4.7. Installing other Python programs using PIP in Nano Server
In this section, we will demonstrate how we will use PIP to automatically download the Python programs or packages and install them into the Nano Server.
# Install Python Pyfiglet Library using
#  Python preferred installer program (PIP)
pip install pyfiglet
# Install Python TermColor Library using
#  Python preferred installer program (PIP)
pip install termcolor
# Install Python Colorama Library using
#  Python preferred installer program (PIP)
pip install colorama

5. Conclusion
Voila. This is Python 3.x running in Nano Server directly using Python commands and you can also try deploying Django or maybe TinyDB that is Python 3.x version supported. Unfortunately, we cannot get Python 2.7.x to work in Nano Server TP5 due to some other dependency required by Python 2.7.x but it should not be a major disappointment for everyone. Applications written in Python 2.7.x should be migrated to Python 3.x very soon because Python 2.7 End of Life date is set to 2020 and there will be no Python 2.8.
# Execute the Python command to demonstrate the
#  use of those Python programs or packages installed
#  by Python preferred installer program (PIP)
python -c "
import sys ;
from colorama import init ;
from termcolor import cprint ;
from pyfiglet import figlet_format ;
cprint(figlet_format('Python 3.X in Nano Server by Ryen Tang MVP')) ;
"

